
This evidence-first approach protects both buyer and supplier. The buyer can request a focused technical response, while the supplier can identify a part mismatch, installation issue, adjacent fault, or genuine product concern without guessing from one audio clip. No generic article can diagnose a particular vehicle remotely. The vehicle service instructions and a qualified inspection remain the controlling references.
Describe the noise before naming a failed part
Begin a case record with the vehicle, model year or production period, axle, side, mileage, suspension configuration, installed part number, and replacement date. Note whether the noise existed before the replacement, disappeared for a period, or began immediately after the work. Keep the invoice or work order and the old part reference if available. A later claim is harder to interpret when several repairs occurred at the same time.
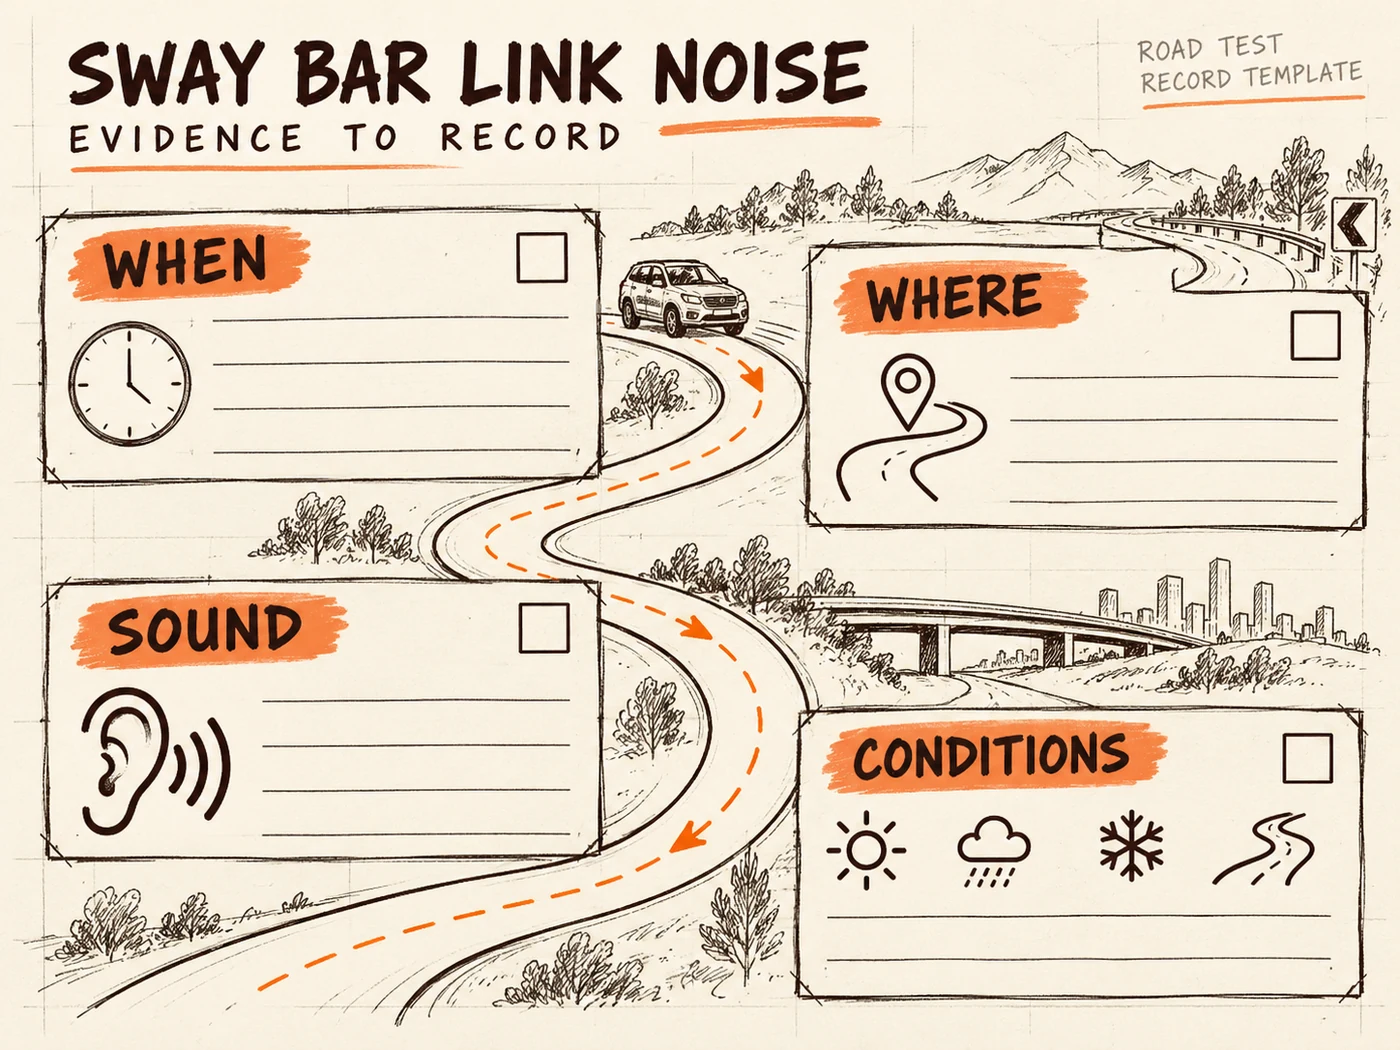
Describe the sound in ordinary terms: single knock, repeated rattle, pop, squeak or vibration. Then record the exact trigger. Is it heard on a low-speed bump, during a turn, over washboard pavement, while braking, or when the vehicle is stationary and the body is rocked? Does it happen loaded or unloaded, on one side only, or after a particular temperature or weather change? These observations do not diagnose the source, but they make a road test reproducible.
Use a short, safe route and record the conditions that reproduce the sound without provoking a hazard. An audio or video clip can help if it includes the route context, road speed range, cabin or exterior recording location, and the moment of the noise. Avoid using a clip as standalone proof: microphones distort direction and intensity, and neighboring suspension parts can sound similar. MOOG notes that sway bar link symptoms overlap with other steering and suspension problems.
Verify the supplied link and installation record
Before assessing a warranty return, check that the installed link is the one ordered. Compare the packaging label, seller SKU, OE reference, axle and side against the vehicle and the purchase record. Confirm whether the part is handed, and compare stud orientation and link length with the part-specific drawing. MOOG has documented specific applications where apparently symmetric links can be installed on the wrong side and later produce knocking. That example does not establish the cause on another vehicle; it shows why orientation belongs in the inspection record.
Document the hardware and installation method. Were new nuts, washers or bushings supplied, and were they used in the specified order? Are the fasteners seated and secured according to the product and vehicle service procedures? Record the actual procedure or torque specification source rather than inventing a universal value. MOOG’s installation advice for one bolt-style link design warns about overtightening; that advice is design-specific and should not be copied as a MAKEXCAR torque rule.
Photograph both link ends while installed, the surrounding clearance, the hardware, and any visible witness marks or contact points. Where the work order includes an alignment or other suspension repair, preserve that context. If a component was removed and reinstalled more than once, record it. A photograph of a loose, cleaned return on a bench may omit the clue that mattered on the vehicle.
Inspect the link and its neighboring components separately
Mevotech’s diagnostic guidance lists visual checks, a loaded-wheel assessment and a link shake check as ways to inspect stabilizer end links. It also highlights that stabilizer bar bushings can produce clunking or rattling and should be checked for movement. Its later diagnostic article advises checking links with vehicle weight on the wheels and at ride height. These are supplier educational methods; the actual vehicle procedure and safe workshop setup must govern the inspection.
Record whether there is free play at each ball-and-socket end, damage to a boot, corrosion, grease loss, a loose mounting interface or contact with another part. Note which end showed a finding; “link loose” is not specific enough. A technician should also inspect the bar-to-body bushings and brackets, control arm interfaces, strut mount area and other reachable chassis parts indicated by the vehicle diagnosis. Do not assign the noise to the link merely because it was the most recently replaced part.
If the noise is reproducible but no defect is evident, use the service procedure to isolate sources. MOOG describes suspension-noise isolation as a way to locate loose or worn components. A controlled comparison can include loaded and unloaded conditions, a documented road test, and component-specific checks. Avoid disconnection or improvised road driving unless the manufacturer’s procedure and technician assessment allow it. The goal is a finding that another technician can repeat, not a dramatic demonstration.

What evidence should accompany a supplier claim?
A complete case file has four layers. The first identifies the application and part: vehicle details, axle and side, installed SKU, OE reference, batch or package identifier and replacement date. The second documents the symptom: location, trigger, recording and whether the symptom existed before repair. The third records installation: hardware, orientation, service-instruction version and relevant work-order notes. The fourth records inspection: photographs, measurements or play observations, adjacent-component checks and the technician’s conclusion with its limits.
Write the technician’s observation separately from the buyer’s hypothesis. “Knock reproduced over the same low-speed bump; movement visible at the upper link socket” is a much stronger observation than “new link failed.” If the technician has not isolated the source, state that honestly. A supplier can then request a targeted follow-up rather than accepting or denying a claim based on an unsupported assertion.
| Case element | Useful record | What it can establish |
|---|---|---|
| Part identity | Packaging, SKU, OE reference, axle, side, batch | Which supplied item was installed |
| Reproduction | Road condition, maneuver, speed range, clip context | Whether the symptom can be repeated |
| Installation | Work order, orientation photos, hardware and method | How the item was fitted |
| Component finding | End-specific play, boot condition, clearance or witness marks | What was actually observed on the link |
| Neighbor checks | Bar bushings, brackets and relevant chassis inspection | Whether an alternative source was examined |
Keep the original photos and files with dates rather than exporting only a cropped screenshot. Label any later annotations so they are not mistaken for the original record. If the returned part is disassembled, note when and by whom; dismantling before initial photos can remove evidence of installation or contamination. Send only the information needed for the case, and handle vehicle or customer identifiers according to the parties’ normal process.
How to handle an inconclusive inspection
Sometimes a road test confirms noise but the first visual check finds no looseness. That result is not a pass for every part, and it is not proof of a manufacturing defect. Record what was tested, under which loading conditions and by whom. Note that the source remains unconfirmed. The next step may be a repeat test with a different load state, an approved noise-localization method, or a focused inspection of neighboring components.
If a link is replaced again and the sound changes, document the before-and-after conditions carefully. A change after replacement is useful evidence, but it does not automatically identify the internal failure mechanism. The second installation may also change hardware, preload, routing or neighboring contact. Preserve both parts and work orders when possible. Avoid making categorical claims until the observations support them.
Where the link has obvious damage or free play, follow the applicable service guidance for vehicle safety. The purchasing team should then ask whether the returned item is the exact supplied SKU and whether the condition could relate to impact, contamination, fit, installation or manufacture. The purpose of this checklist is fair root-cause investigation, not to dismiss a valid return.
Questions purchasing teams often ask
Does a knock after replacement mean the new link is faulty?
No. The timing raises a relevant question, but the noise can come from a part mismatch, orientation, mounting hardware, bar bushing or another chassis component. Reproduce the noise and inspect the link and neighboring parts before assigning cause.
Is an audio recording enough for a return?
Usually it is only one piece of evidence. Add vehicle and part identity, the road condition, installation record and a technician’s inspection finding. Audio alone rarely locates the source precisely.
Should the returned link be cleaned before inspection?
Preserve the as-received condition in photographs first. Dirt patterns, contact marks, loose hardware and boot condition may matter. Follow any supplier return instructions for packaging and safe handling, but keep an original record before cleaning or disassembly.
Make the follow-up request precise
For a MAKEXCAR stabilizer link claim, provide the exact product reference, vehicle and suspension details, axle and side, installation date, mileage, road-test conditions, installation photos and inspection notes. Say which findings are confirmed and which remain open. If the part has been removed, label and retain the returned unit with its package or batch information.
Use the contact page to submit a documented technical inquiry or request the part-specific fitment information. A clear case file lets both sides decide what to inspect next and whether the evidence supports a product return. The sound starts the investigation; the records make it answerable.